

Consider signing up for our PreK-12 Email List for future opportunities.
Below you can find activity guides as well as videos for this month’s activities!
Physics Activity: Candy Diffusion of food dyes
Materials:
2 small disposable plates
Skittles
M&Ms
Science Kitchen cup
You will also need:
Water
Curiosity
Protocol:
- Place the two plates on a flat surface.
- Empty the Skittles onto one plate and almost all of the M&Ms onto the second plate (save the extras for the chromatography)
- Arrange the candies in a circle at the edge of the plate so there is no space between candies.
- Fill your Science Kitchen cup with about a cup of tap water.
- Slowly pour the water into the center of each plate until the water just touches the candies. Try not to pour it too fast or the candy circle will be displaced.
- Observe the diffusion of color dyes.
- Take a photo of your ‘candy color wheel’
Chemistry Activity: Candy Chromatography of food dyes
The Discovery of Chromatography
Chromatography, or “color writing” from the Greek chroma “color” and graph “to write,” is the science of separating mixtures. We also refer to it as Tsvet’s science, after the Russian scientist who discovered the technique and coined the term “chromatography.” Mikhail Tsvet (“tsvet” is coincidentally a Russian word for “color”) discovered that since different color pigments have different weights, they are carried along at different speeds, and end up in different places. Sadly, Tsvet’s work remained untranslated from Russian for years and he was not fully recognized until after his death. Today his gravestone carries the inscription: “separating molecules, uniting people.”
Different substances (gas or liquid) to carry the color, and by examining where different tints end, figure out what pigments were combined to make it. Chromatography is now widely used in biochemistry to figure out the ingredients that make up a particular scent or flavor, to detect traces of drugs in urine, and to find traces of pollutants in drinking water.
Materials
M&Ms: ~1/4 cup
Science Kitchen cup
Plastic pipet
Foil
#2 Whatman filter paper
Craft stick with painter tape
Cotton swabs
Pipe cleaner
Paper napkin
You will also need:
Pencil
Water
Curiosity
Questions:
What results did you get? Are the results what you expected? Why or why not?
Why did the dyes move up the filter paper to their different locations?
What conditions will affect the movement of the dyes? What can you vary or control to see different results? Think about the solvent (water), the amount and concentration of your samples, temperature, your chromatography paper, etc.
Think about the following before starting.
● What are primary and secondary colors?
● What colors do you see in your bag and which 5 colors will you choose for the chromatography?
● What do you expect to happen?
1. Undo part of the blue painter tape on the craft stick so a sticky piece is hanging loose. Then slide the filter paper up against the craft stick and secure the top of it with the painter tape. When you place the craft stick across the top of your Science Kitchen cup the filter paper should not be touching the sides or bottom of the cup
2. Start by taking the filter paper and wooden dowel set-up. Holding it up to the cup with wooden part resting on the edge, mark the ⅓ cup line on the filter paper using a pencil. Lay the filter paper on a flat surface and using a flat edge continue the rest of the line on the paper.
3. Fill the cup to the ¼ line with water.
4. Workspace: open the foil and lay it on a flat surface
5. On the foil, place 5 or 6 M&M candies spaced ~3-5 inches apart. Try to include 2 primary colors and a brown and green M&M in the choices. Pipet 5-7 small drops of water onto each candy. If you get too much water in a spot, the food dye diffusing into the water will be too diluted for the chromatography.
6. Using cotton swabs or the pipe cleaner, carefully pick up food dye from the M&Ms and make a concentrated colored spot along the pencil line from step 2. You likely need to add dye to the spots several times.
7. Let the food dye dry for a few minutes.
8. Set the wooden craft stick into the cup with water solution, making sure the pencil line and dye spots are above the solution. Allow the water to travel up the filter paper.
9. When the water level on the filter paper reaches near the tape or color separation is observed, remove your filter paper/craft stick and lay it on the napkin or foil to dry.
10. Observe.
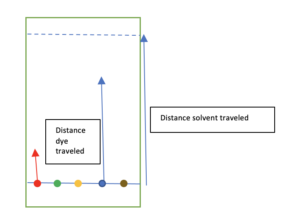
Calculate your Rf. This is the ratio between how far the dye and the solvent (water) traveled on your filter paper. Measure how far a dye traveled in mm or inches. Measure how far your solvent traveled in mm or inches. In the lab, we would measure from the center of a known concentration of dye but in your activity we will use a visual estimate of ‘baseline’. Depending on the solvent, Rf values can be compared to known values of solutes to determine ‘unknown’ solutes.

This project was supported by an Institutional Development Award (IDeA) from the National Institute of General Medical Sciences of the National Institutes of Health under Grant # 2P20GM103432 and the support of the UW Science Kitchen/Space Grant Consortium. We thank the efforts of Valerie Kuehl, Annie Bergman, Lea Bergman, Deana Sadrieva, Megan Candeleria, and Jacklyn Green.
Past Activity Guides:
September 2020 – International Observe the Moon Night
October 2020 – Spooky Science
December 2020 – Exploring Electricity
Spring 2021
January 2021 – Physics and Chemistry with Candy
February 2021 – Mars Lander