

If you reserved a Spooky Science Grab-n-Go kit, it will be ready for pickup the week of October 26th. Check your email for details of your pickup location and time!
All of our 200 𝐒𝐩𝐨𝐨𝐤𝐲 𝐒𝐜𝐢𝐞𝐧𝐜𝐞 𝐊𝐢𝐭𝐬 have been spoken for! If we end up with extras, we will send out word on our PreK-12 Email List
You can also find the lesson plans for the five activities included in the kit below (along with a bonus slime activity!)
To recreate the kit, you will need the following supplies:
Candy Catapult
· 10 Jumbo Craft Sticks
· 3 – 5 Rubber Bands
· Small Candy (or other items!) to fling!
· Bottle Cap (optional)
· Hot Glue Gun (optional)
Frozen Halloween Hands
· Disposable Glove
· Rubber Bands
· Pipette
· Small Items to Freeze
· Water
· Salt (optional)
· Food Coloring (optional)
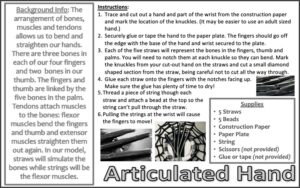
Articulated Hand
· 5 Straws
· 5 Beads
· Construction Paper
· Paper Plate
· String
· Scissors
· Glue or tape
Ghost Rockets
· Film Canisters
· Black marker
· Alka seltzer
· Water
· Cornstarch (optional)
Candy Chromatography
· Pack of Skittles
· Straw
· Pipette (eye dropper)
· Coffee filter
· Clips
· Your Science Kitchen Cup
· Black marker
· Salt
· Water
· Plate
(Bonus Activity)
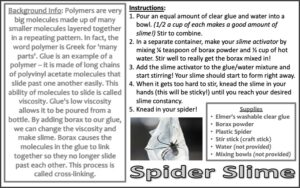
Spider Slime
· Elmer’s washable clear glue
· Borax powder
· Plastic Spider
· Stir stick (craft stick)
· Water
· Mixing bowls
 Spooky Science Postcard Teaser")

Spooky Science Activity Guides, Helpful hints, Tips, and Tricks!
Candy Catapult
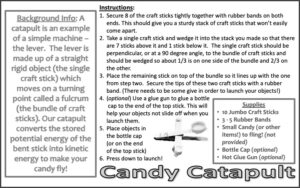
Tips and Tricks: It really does work better if you attach a bottle cap! This will keep the projectile from slipping off the stick when you launch it!
References:
Halloween Popsicle Stick Catapult Activity
Ghost Rockets

Helpful Hints: We aren’t kidding – please do these outside! They are pretty messy.
You don’t need to use a whole tablet of Alka-Seltzer each time; a quarter tablet will work and let you launch more times!
Tips and Tricks: These take off pretty quickly and with a surprising amount of force. Make sure no one is leaning over them when they launch!
References:
Ghost Rockets for Kids
Candy Chromatography

Helpful Hints:
By far the trickiest part of this one is getting your drops of color not to run together. You want to put a very small amount of each colored water on the filter paper; it is sometimes easier to do this by ‘dabbing’ the filter against the wet candy shell rather than using the pipette to transfer the colored water.
You don’t want too much salt water in the cup; the bottom of the filter paper should just brush up against the top of the salt water.
Tips and Tricks:
This activity will also work with non-permanent markers. Take a purple, black, or orange non-permanent marker (you can try it with other colors too!) and make a dot of color on the bottom of a rectangle of filter paper (or several dots of different colors across the bottom). Place the filter paper so it just touches the salt water and watch the colors separate as the salt water creeps up the filter!
Salt water won’t work with permanent markers like the sharpie included in your kit. But if you have some isopropyl alcohol (rubbing alcohol) you can mix a new solution of isopropyl alcohol and water and try the experiment with your black sharpie!
References:
Candy Chromatography Science Project
Frozen Halloween Hands
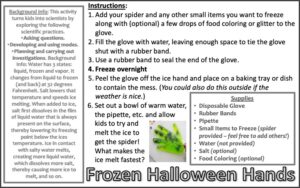
Helpful Hints: It helps to freeze the hands flat if possible, as this will let them sit on the baking dish a little easier.
Some people like to add glitter to the water before freezing!
Tips and Tricks: Before you try to melt the hand, it can be fun to take it into a dark room and shine a flashlight through it!
References:
Haunted Halloween Hand Melt – A Salt and Ice Experiment for Kids
Articulated Hands
Helpful Hints:
This one is a little tricky to build; our test 5yo helped with one finger and then got a bit bored – but he enjoyed playing with the final project!
Your ‘knuckle cuts’ don’t have to be perfect; they just need to allow the straw to bend!
Tips and Tricks:
We found it easier to thread the string through the straws before gluing them down – although it sometimes came out and we had to restring it!
We first tried this without using the beads at the top of the finger to secure the strings and just taped the strings to the finger tops. The tape regularly came unstuck. We definitely recommend the beads!
References:
DIY articulated hand model
(Bonus) Spider Slime
Helpful Hints:
Slime is messy….so very messy.
Tips and Tricks:
It takes some practice to get the right slime consistency. Don’t give up if it doesn’t feel right at first – keep playing with it!
You can store slime for around 5-7 days in an airtight container for continued fun!